![]()
Making Tables 101
The purpose of this page is to make first time builders aware of what to take into consideration before attempting to build a table. A lot of material and work goes into such a project so it is best to be prepared. Tables can be very basic, nothing more than a panel fastened to some legs, or very elaborate, the more complicated they become the more pitfalls you may run into. The most common failure is not allowing for wood movement. Wood is a very unstable material, it constantly expands and contracts, how much depends on the species and the climatic conditions it is subjected to. Well made furniture will allow for this movement, it cannot be prevented or forced not to move, something always has to give. |
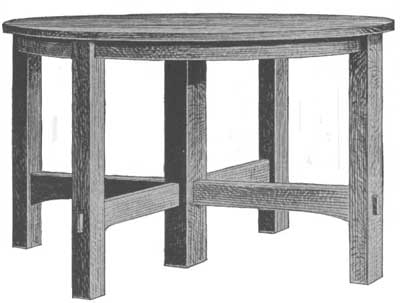
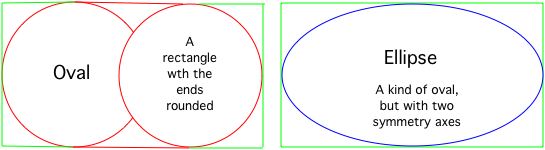
Free Plans for Mission Style Table and Chairs Coffee tables, end tables or sofa tables have no boundaries, you can design them pretty well as you please as long as they fit into the room setting and are mechanically sound. Dining tables on the other hand do require some planing and have to be built to certain standards. The height is important, you have to be comfortable eating while sitting on a dining chair, 29 - 30 inches is a standard height. If the table is too narrow there will not be enough room for the plates and the serving dishes in the middle of the table. Too wide or too great a diameter will cause your guests to feel isolated sitting so far across the table. You can get by with a 36" width in a small room, 42" is desirable. The seating capacity of a table will depend on whether it is used for a formal dinner or family breakfasts. Rectangular Table Capacities 72" long will seat 6 people 96" long will seat 8 people 120" long will seat 10 people Square and Round Table Capacities 36" - 48" will seat 4 people 60" will seat 6 people 72" will seat 8 people The above recomendations are for formal dining, in casual situations a couple extra seats can be used. Legs, rails and aprons must allow ample leg room while sitting. Allow at least 12" free space from the front of the chair seat. The dimensions of the dining room will determine the size and shape of the table, there must be room for access on every side of the table so your guest don't feel confined or restricted. Having an oval top in a smaller room may allow for easier access. You have to take the kind of entertaining you do into consideration, if you frequently have dinner parties of six people, but occasionally host 12 or 14 then you should consider an expandable table. One must also consider that the overall size of the table will accomodate a standard size table cloth, Style of TopsThere are basically four styles of dining table tops, square, rectangular, round or oval. The first three are pretty self evident, oval styles may vary from rectangles with rounded corners to true elipses.
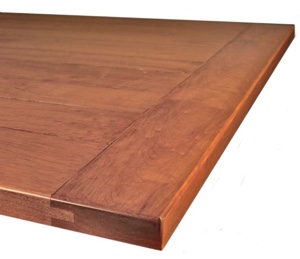
The boards making up the top may run in the long direction as we often see in what are called harvest tables, or if it is an expandable top they will generally run in the short direction. When the boards run in the long direction the ends are often treated with a breadboard end. Due to seasonal expansion of the boards across the table there is a special technique to fastening this board.
Gluing up a Top On any glue up grain direction has to be taken into consideration, wood expands more across the grain than with the grain. When two boards are fastened together with grain running in opposite directions the wood will not be able to move, resulting in cracks or broken joints. A common mistake is to run a strip across the bottom of a panel fastened with glue and screws hoping to stabilize the top. It is preferable that the boards making up the top be glued together to make a solid top as any cracks or spaces will trap food crumbs or spilled liquids. Use wood that is dry and let it aclimitize to conditions similar to where it will be eventually used before assembly. Be patient and plan ahead, most lumber you bring home will likely have a moisture content of around 15%, you will have to store it in your shop stacked and stickered for at the very least a week, possibly longer to get the moisture content down to 8 - 10% to start working on it. Start with boards that are perfectly flat and both edges straight, this can be done with a hand plane, or power tools if they are available. The three power tools most commonly used are a jointer to flatten one face and straighten one edge, a thickness planer to make the board an even thickness and a table saw to straighten the second edge. Don't be tempted to force imperfect boards into position with the clamps at glue up. Dowels or biscuits may be used to help in alignment but are not necessary and usually more trouble than they are worth. To keep the top of the boards aligned use cawls as illustrated below.
Clamps across the boards are not shown in the drawing. Rather than attempting to glue up all the boards in one go it is often easier to glue them in pairs first, then glue two pair together, then glue the next pair to the first two and so on until the panel is completed. It is always a good idea to get more material than you actually need, wood is unpredictable so if a board does warp or twist you can replace it with another and use the good sections of that board where short lengths are required. FinishingEven with the best of intentions the boards on the top do not always come out even with one another. You are now faced with two choices, take it to a shop that has a wide thickness sander, not always feasible, or level it with hand sanders. The quickest way is to start with a Belt Sander, but be aware that they are very agressive, it is easy to gouge the top and create even more work for yourself. Forget what you have read about sanding and work across the grain, going with the grain will cause the top to become wavy. Once the top is even finish off with a Randon Orbit Sander. Pedestal Base vrs. Four Legs Any style of top will work with either, the legs mounted on the exterior corners of square and rectangular tops will seldom be in the way. With an oval top due to the curvature on the end the legs have to be set back so may interfere with seating along the side so a pedestal base may be a better choice. Generally this is a matter of personal preference rather than necessity. Pedestal bases do not need to be as wide as you may think, a 42" wide top will be stable on a 24" wide pedestal base. Fastening Table Top to Apron Most table tops will have a frame under them known as an apron, typically the top and often the legs will be fastened to it. Any top made from glued up solid boards will expand and contract due to climatic changes, special fasteners are descried in the link below.
Visit Absolutely Free Plans for a selection of free plans for tables |
|
|