"Helping Woodworkers Online For Over 20 Years"
Puzzle Joints are not only interesting in themselves, but are often excellent studies in craftsmanship. The majority of them, if to be satisfactory as puzzles, call for very careful setting out and cutting, entailing the same degree of skill that is demanded for high-class cabinet work. For this reason several examples may well find a place in a volume dealing with woodwork joints. As a rule, these puzzles should be made in hardwood, such as dark walnut or beech, as in whitewood the joints are soon liable to wear.
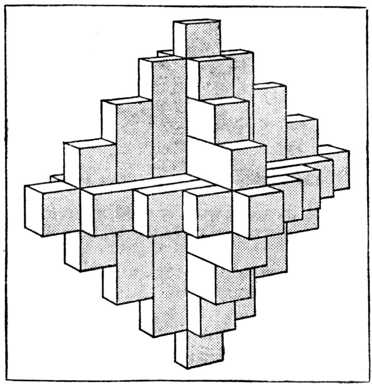
Chinese Puzzle.—The ingenious puzzle of the Chinese type shown in Fig. 369 is probably older than many of us could guess, but as it is one that can be made by any woodworker we give full directions as to how it may be constructed. The complete article may be called, in form, a six-pointed pyramid. It is made up of twenty-one different pieces, each cut from wood 1⁄2 in. wide and 1⁄2 in. thick; 3⁄8 in. wood may be used if preferred. For the purpose either sycamore or white maple is the most useful.
Fig. 370. |
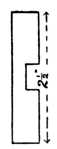
Fig. 371. |

Fig. 372. |
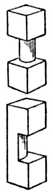
Fig. 373. |
The Three Cross Pieces. Key Piece.
The pieces required are as follows:—
Fig. 370.—Six pieces, 31⁄2 ins. long, with a half slot cut in the centre as shown. This slot must be exactly the width of the wood's thickness, and cut exactly half way through, so that, if two pieces are placed across by means of the halved joint, their surfaces will be flush. The slot must also be exactly in the centre.
Fig. 371.—Six pieces, size 21⁄2 ins. long, with a half-cut centre slot similar to that of Fig. 370.
Fig. 372.—Six required, these being 11⁄2 ins. in length, and with slots in the middle as before.
Fig. 373.—One of these last six requires special treatment, as it forms the key block of the puzzle. After its slot has been cut, one half of the narrow part must be sawn away, as shown in Fig. 373. The inner edge must also be gently rounded. The special use of this vital piece, which we will call the "key," will be fully explained presently.
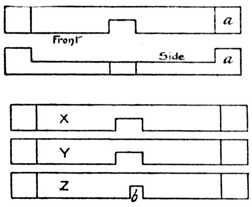
Fig. 374.—Then, in addition to these, there are three central bars to make. Like the other parts they are 1⁄2 in. by 1⁄2 in., but are each 41⁄2 ins. long, and are cut as shown in Fig. 374. The end projections a are 1⁄2 in. long, and the cut-away part is exactly half the depth of the wood. Two of the three pieces (X and Y in Fig. 374) are similar, but the slot b of the third one (Z) is only 1⁄4 in. wide instead of 1⁄2 in. As will be noticed, this 1⁄4-in. slot is not in the centre, but corresponds with the right-hand half of the larger slots of X and Y.
In making these twenty-one pieces, what should be borne in mind is that the different parts fit closely into each other. Consequently the slots, in width, must be cut so as to grip the thickness of the wood; in depth they must be exactly half this thickness.
Fitting the Puzzle.—The three central bars must first be joined, as those form the skeleton framework of the structure. Fig. 375 shows them in position, but as it is a puzzle in itself as to how they can be got thus some explanation is necessary.
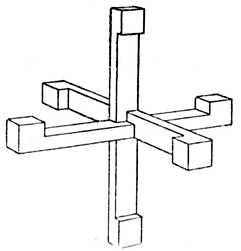
Fig. 375.—The Three Central Bars in Position. |
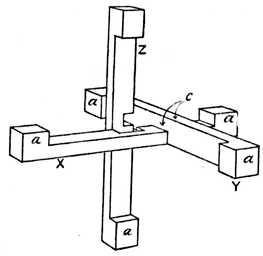
Fig. 376.—How to Adjust the Bars. (Note position of projecting ends, a.) |
First Stage.—First take the bars X and Y (see Fig. 374) and arrange them as shown in Fig. 376. It is most important that the projections a of X face upwards, and that the projections a of Y face towards the centre. Then take the bar Z and bring it flat into the slot of X. The little slot of Z, however, must remain above the slot of X. Then slide the bar Y along to the centre, so that the part lettered c slips into the little slot of bar Z.
This may seem confusing to read, but it is easy to follow when the pieces are in one's hand. The result of this rather clever arrangement is that the six arms of Fig. 375 are all exactly the same length, width, and thickness. They are also arranged so that in each arm may be clasped one piece each of Figs. 370, 371, and 372. The three central arms may, of course, be set up in a different order, and here we have merely chosen the way that is the most simple to describe and illustrate.
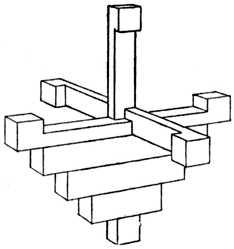
Fig. 377.—Beginning to place on the Cross Pieces. |
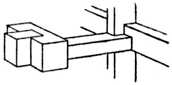
Fig. 378.—Placing the Key Piece to overlap end projection of Central Bar. |
Second Stage.—In the remaining part of the work the chief difficulty is to keep the puzzle from falling to pieces before the key finally locks it. Take the longer cross parts, Fig. 370, and clasp one to each arm. The six need not all be put on meanwhile, but only those which are most easily handled. The next size (Fig. 371) may then be put on.
In the ordinary course each arm could be completed with its three cross pieces till the sixth was attempted, and here the reader would find that, at the last moment, his attempt was frustrated. He could not get the last small piece in, as other bars lock the puzzle. Here it is that the "key" comes in.
The Key Piece.—When the writer fits up the puzzle he finds that three of the arms may straight away be fitted complete with their three cross parts. These are the ones where the longer cross piece (Fig. 370) lies flush with the back of the central bar (see Fig. 377). This is easily found out when at work on the puzzle. In the case of the other three arms there is, of course, a gap caused by the long slots of the central bars. Adjust the parts on the first-named three arms, and then deal with the fourth arm, putting in all three cross parts. For the little one here, use the "key."
By placing the "key" so that it overlaps the end projection of the arm (see Fig. 378) a space is left at the centre, and means is thus afforded for getting in the three cross parts on the remaining two arms.
This practically ends the puzzle. While the "key" is in its overlapping position the parts may be separated, but if it is turned round on its narrow neck, so that it is in exactly the same position as the other five small cross parts, it locks the whole thing so tightly that nothing but sheer force could loosen the twenty-one pieces.
So far as the order of putting together is concerned, there are many equally satisfactory ways, these being determined by the ease or difficulty that one experiences in holding the half-finished puzzle. It all comes to the same in the end, and the "key" must be placed on one bar before the last three arms can be completed. The "key," moreover, must be on one of the bars where a gap is left at the centre, and not on one where Fig. 370 lies flush against the central arm as in Fig. 377.
Undoing the Puzzle.—To take the puzzle to pieces all that is required is to turn the "key" half round and push the other two cross bars on that arm towards the outer point. The cross bars below may then be removed, and the whole structure falls to pieces.
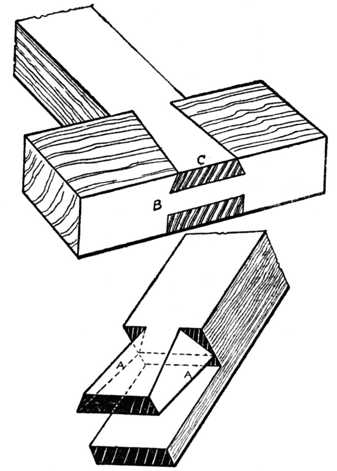
The double dovetail puzzle (Fig. 379) consists of two pieces of wood (usually one dark and the other light) which, upon examination, appear to be dovetailed together from each face. This interlocking arrangement is obviously impossible, and the solution of the puzzle is only apparent on examining Fig. 380, where it will be seen that the joint fits together diagonally.
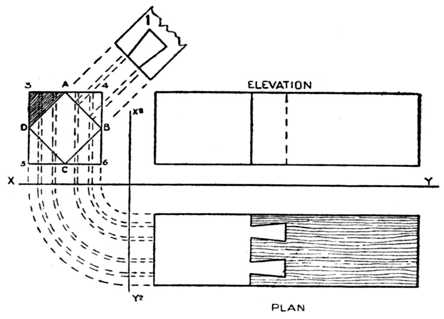
At Fig. 381 are given the diagrams for setting out. Draw the outline of the elevation, plan and end view. The end view in the first instance is indicated by 3, 4, 5 and 6, and it measures 17⁄8 ins. square. A 17⁄8-ins. square is simply used because 2-ins. wood generally finishes this size after it is planed up. Set out a square (A, B, C, D) which stands corner-ways in the larger square (3, 4, 5, 6). Project the lines D A and C B upwards as at 1, and on to this drawing (1), set out the dovetail according to your own idea of length, width and bevel. Project the four points of your dovetail downwards into the end view, and where these lines cut A, B, and D, C draw them downwards and rebate them into your original plan. This will give the true shape of the two dovetails and it is to this shape that you will cut your joint.
The joint is in due course glued up, and next day you will plane and waste off the four corners of your model. The end view shows one corner shaded D, 3, A; this and the other three corners are wasted away. The result is that the dovetails are thrown into a plane different from that in which they were made, showing as Fig. 379.
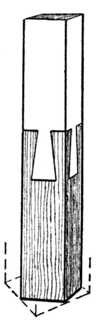
Fig. 379.— Double Dovetail Puzzle. |
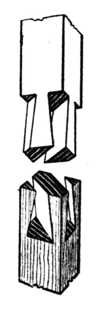
Fig. 380.— The Two Parts Separated. |
(Note that dovetail is cut on slant, the thickness at front being less than at back. See dotted line on plan below.)
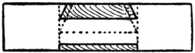 Fig. 384.—Plan, looking upwards.
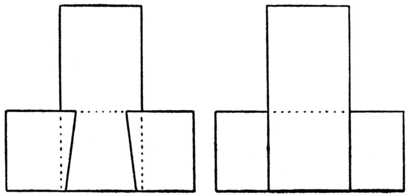 Fig. 385A.—Front Elevation. Fig. 385B.—Back Elevation.
The model calls for very accurate workmanship and the joints must not be undercut during the sawing and chiselling operations. The completed model measures 6 to 7 ins.
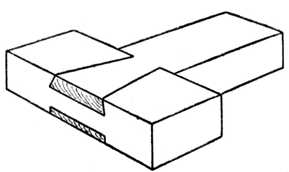
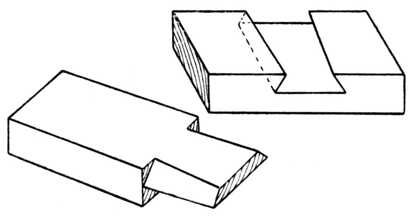
The Dovetail Puzzle joint illustrated at Fig. 382 has perhaps caused more argument and controversy amongst woodworkers than any wooden joint. It may be neatly made in maple, walnut, or mahogany, and afterwards glued up. The question everyone asks is: How was it put together?
Take two pieces of wood such as mahogany, walnut or birch, about 6 ins. long by 17⁄8 ins. wide and 11⁄4 ins. thick. Truly plane them up and then set out and make the tenon and dovetailed piece (Fig. 383). Next mark out and cut the cross bar to fit its corresponding piece. The joint will go together in a somewhat diagonal direction as it is pushed into position from the back; when closed it will appear as at Fig. 382. For guidance, a plan, part elevation and back elevation are added.
An improvement after you have gained experience in the making of this joint is to make a similar joint, leaving the face (B, Fig. 386) blind; it then does not show the bevelling of the dovetail at the end C. In other words, keep the line C, say, 1⁄4 in. back from the face of B. The joint should be glued up and it will then appear to the average worker that it is an impossible proposition. (See Fig. 401, page 208.)
Carefully note that the edges A, A are parallel to each other in spite of the fact that they slope in one direction.
A further variation of the puzzle is seen in Fig. 387. Here the joint is much simpler, and can easily be followed from the illustration.
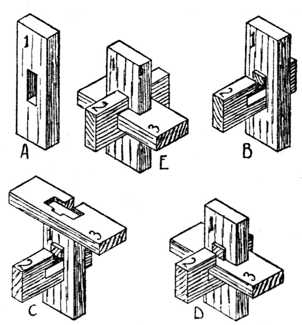
Cross Puzzle.—Fig. 388 illustrates a six-piece puzzle joint, similar in some respects to Fig. 369, but very much simpler. Both a back and front view of the piece D is shown for clearness of illustration. The method of assembling the pieces is as follows: Hold piece B upright, and fit piece D across; at the same time note that the small x marks are opposite each other. Take piece E and, holding it as shown, slide it up the piece B (see arrow) until E engages D and the small o marks are opposite each other. Piece C is now fitted behind D, and then piece F will slide in position and push downwards. The key-piece A is now put in position, and the puzzle is completed.
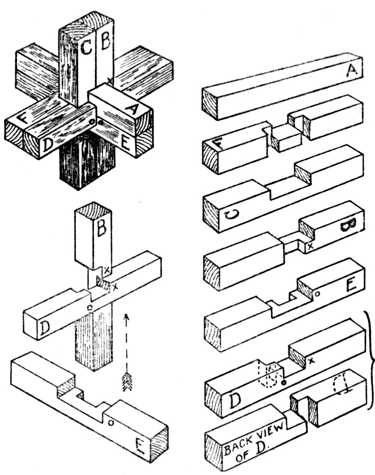
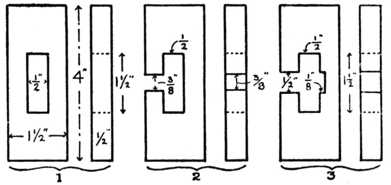
Mortising Puzzle.—The ordinary mortising exercise is, after the first two or three attempts, generally voted as uninteresting, but, although the simple puzzle shown in Fig. 389 is practically an exercise in mortising, yet, forming as it does a puzzle, it becomes a fascinating piece of work.
The puzzle is composed of three pieces of wood, each 4 ins. long, 11⁄2 ins. wide, and 1⁄2 in. thick. In each piece a mortise 11⁄2 ins. by 1⁄2 in. should be cut as shown at 1, Fig. 390. In one piece, marked 2, a groove is cut on one side, 3⁄8 in. wide, and in another piece (3) a similar slot, but 1⁄2 in. wide, is cut, and this is continued on the other side of the groove to a depth of 1⁄8 in. The three pieces should be set out on a 13-ins. by 11⁄2-ins. by 1⁄2-in. length of wood, as shown at Fig. 391, and when ready sawn apart.
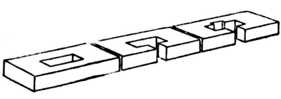
The puzzle is put together as shown at Fig. 389. In the first place, hold No. 1 piece upright as shown at A, then take No. 2 piece with slot uppermost and push it through the opening in No. 1 piece until the nearest side of the slot projects 1⁄8 in. as indicated at B. Next place No. 3 piece on with the slot at the back as shown at C, and push it down until it touches the bottom of the opening in No. 2 piece as illustrated at D. The only thing to do now is to push No. 2 piece as far as it will go to make the figure as shown at E.
In this puzzle the parts should fit together fairly tight, but should not be too stiff.
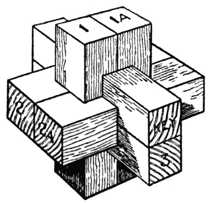
Fig. 392.—Chinese Cross Puzzle. |
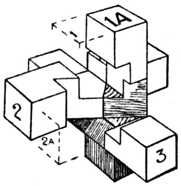
Fig. 393.—Method of Putting Together. |
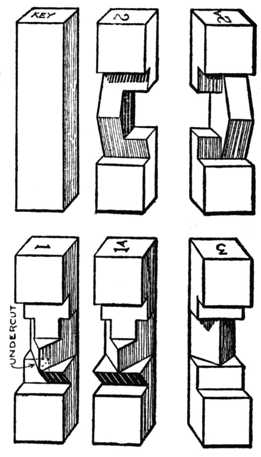
Chinese Cross.—Fig. 392 shows a variation of the Chinese cross, which is perhaps the most fascinating of all woodwork puzzles. Take six pieces of hardwood (Fig. 394) and accurately plane and saw them so that each piece will measure 4 ins. by 1 in. by 1 in. Bearing in mind that all the cuts are multiples of 1⁄2 in., set out, saw and chisel five of the pieces to agree with the sketches 1, 1A, 2, 2A and 3. Leave the key piece intact. The puzzle is of course to fit all the six pieces together so as to form the Chinese cross or block given at Fig. 392. As a clue to the method of assembly we give another sketch (Fig. 393) showing four of the pieces fixed together. The reader can, if he so desires, make the puzzle to a smaller scale by using six pieces of wood each measuring 2 ins. long by 1⁄2 in. by 1⁄2 in.
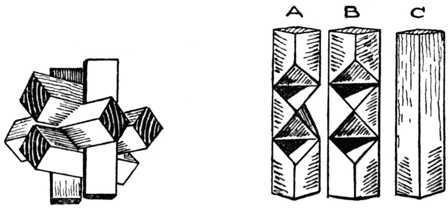
Diagonal Chinese Cross.—At Fig. 395 is given a sketch of a completed Chinese block or cross puzzle in which the various pieces of wood go together diagonally. Plane up a piece of hardwood (which may be about 14 ins. or 15 ins. long) so that it measures on its end 1⁄2 in. square. Cut the wood into six pieces which measure about 21⁄4 ins. long, and then proceed to mark out, saw and pare up with the chisel two pieces like sketch A, three pieces like B, and one key piece as C. Now fit these together to make the completed cross. The solution is left to the reader.
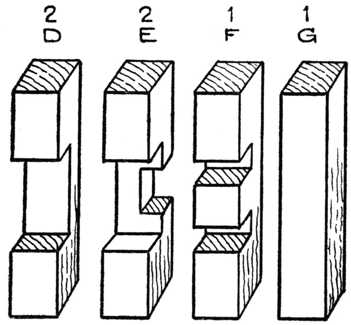
Fig. 396 shows a combination of six pieces which, when fitted together, will make the Chinese cross similar to Fig. 392. Plane up the strip of hardwood (birch preferred) so that it measures 1⁄2 in. square at the end and proceed to mark out and make two pieces like D, two like E, one like F, and one piece like G. Put the pieces together to form the Chinese cross. Again the reader is left to solve the problem of fitting.
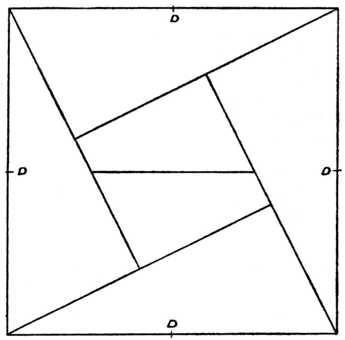
Square Puzzles are of endless variety. Four of these are shown, all simple to make, but not equally simple to solve. The only material required for each is a 5-ins. square piece of 1⁄8-in. fretwood or plywood; or, if preferred, pieces of different colour may be used. The diagrams are given exactly half size, and the lines may be set out direct on the wood. It will be noticed that all four puzzles are strictly geometrical in character.
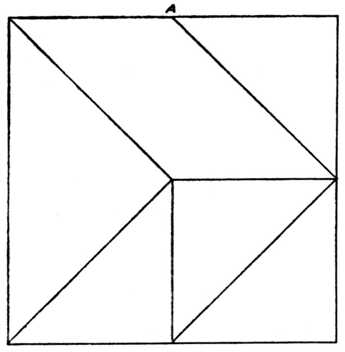
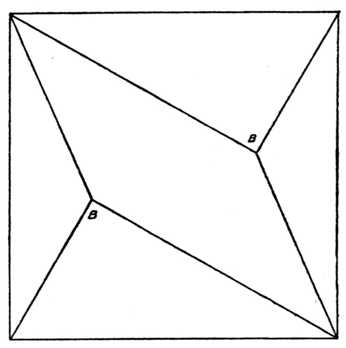
Fig. 397 is made up of six pieces and is the simplest of the group to solve. Although containing only five pieces, Fig. 398 will be found to give more trouble.
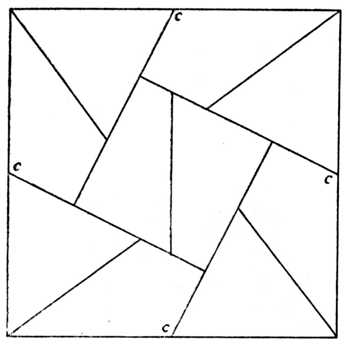
Fig. 399, with ten pieces, is undoubtedly the most trying puzzle, and will be found as baffling as many jig-saw pictures. Fig. 400, again, presents only moderate difficulties.
If the reader prefers, he may cut the squares to the size illustrated instead of enlarging them.
|
|