-
Building a Workbench
Workbenches
come in many shapes and sizes, many are meticuliously crafted and are
the pride of the shop while others are hastily thrown together out of
necessity.
Woodworking
tutorials often suggest building a workbench as a first project, then
offer plans for masterpieces costing hundreds of dollars and countless
hours to build. This in my opinion is a bit like putting the cart
before the horse, you just may end up with a pricey white elephant
taking up room in your shop. There are many factors that come into play
as to the type of bench that will fill your particular needs, in most
cases it is best to let time dictate the criteria.
How much room do you have? This will help determine the size of bench suitable for your shop.
What
type of tools will you be using? Will you be using mostly hand tools or
powered machiney, if you are using hand tools you will want a good vise
and bench dogs. In shops with power tools workbenches are often built
to do double duty as table saw or planer out-feed tables.
What
kind of work will you be doing? Small projects can be assembled on a
bench that is fastened to a wall, the projects can be turned around on
the bench to work on them. When working on larger projects it is often
an advantage to have the bench in the center of the shop so you can
work on all sides of it.
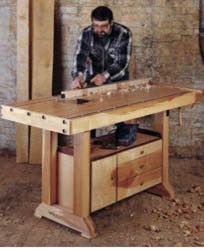
A
bench top should be flat and solid, the thicker the better, 3/4" is
about the minimum, double or triple that is better. You don't want
tools or your project bouncing around on it when you drive in a nail. A
perfectly flat top is critical for assembly work. A solid core door is
a popular choice by many, often on top of a couple sawhorses in the
beginning.
The top
can be a glued up wood panel or sheet goods such plywood or MDF. It is
quite common to cover the top with a disposable sheet of thin hardboard
to protect it from damage from sharp tools and the effects of stray
bits of glue and stain.
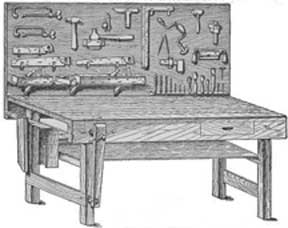
Many
bench tops have tool wells built into them, this is very much a
personal preference as there are both pros and cons about them. Your
tools are out of the way for assembly and you don't have to worry about
banging a finished board against the sharp end of a chisel. On the
other hand they are usually full of shavings and sawdust so you can't
easily find what you are looking for.
Equally
as important as a solid top is a rigid frame to support it. A half-lap
joint in the leg for the vertical stringer is a common method to obtain
maximum support and rigidy. These joints can be cut into material such
as 4X4's or they can be easily made by scabbing 2X4's together.
 |
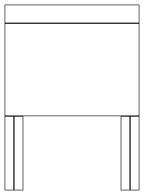
A
simple frame can be made by making two sets of legs as shown. Cut the
long rails to support the top and a shelf 5" shorter than the length of
the top. Cut two short rails to run across the top of each end 2"
shorter than the top to connect the two sets of legs. Cut two plywood
panels to sit below the short rails on the end and fasten them to the
legs, they do not need to be the full height of the bench. |
|
Your
finished frame should be 2" shorter and 2" narrower than the top, this
will allow the top to hang 1" over the frame on all sides. This over
hang will be very handy when it comes time to clamp something to the
bench top.
If your
bench is fastened to a wall only one set of legs will be required, just
fasten the long back stringers to the wall studs.
Dimensions
Space
will be one factor in determining the size of bench to build, but even
if you have lots of room don't make the bench too wide. You don't want
a bench so wide that you can't easily reach across to the other edge,
36" is pretty well the maximum.
Generally the
height is determined by you standing with your arms at your side with
palms facing back, bend your hands up to a horizontal position. The
distance from your palms to the floor is the usual height of the bench.
If you intend to use a lot of hand tools then you may want it a bit
lower, experiment by going through the motions at a kitchen table or at
your table saw and adjust the height to what feels comfortable.
If the
ultimate height is close to your table saw height consider making it to
match the table saw so you can also use it as an out-feed table.
Portability
Portability
of a bench has advantages and disadvantages, the ideal bench is heavy,
this is a good thing when you are working on it, but not when you wish
to move it. Castors can be added to all legs to make it really easy to
move around, however it may also tend to move around while working on
it. Stability can be attained by the use of locking castors, or only
putting castors on one end but this means the heavy other end must be
lifted. The condition of your floor also comes in to consideration, if
it is not flat then the bench will tend to rock because one leg is up
in the air. Always make all four legs the same length and shim under
the short legs rather than building a bench to sit level on an uneven
floor, you may wish to move it in the future.
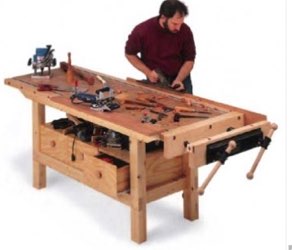
Vises
Anyone
using hand tools will wish to have a vise or two attached to their
bench. Have your vise on hand before starting on your bench so you can
design it to work with that particular hardware. Idealy you will have one on the the front and one on one end.
-
Bench dogs are pins that go
into holes in the bench top so that a board may be held in position
utilizing a attachment on most workbench vises.
-
-
-
-
-
A
bench is any flat surface in the shop, many of us have cast iron
assembly benches that also double as table saws. Furniture builders
have low benches covered in carpet to assemble cabinets on. Many shops
will have a drawing board attached to a wall, and often a "dirty" bench
with a machinist vise for repairing tools. Having a
dedicated "dirty" bench keeps metal shavings and grease from
contiminating your wood projects, one little metal sliver can destroy a
planer blade, grease stains can ruin a finish.
-
|