Milking Stool
 |
|
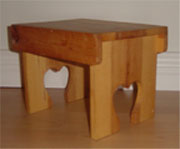
This small stool is handy in the kitchen to get a step up to reach the top cupboards or use it as a stand for a flower pot. Any wood is suitable, pine is not that expensive and easy to work with. My Grandfather built these for milking stools, I have added the heart, he would have simply cut an upside-down vee in the legs. Assembly:  There are five parts to the stool, rip the 8 3/4" wide boards from a 1 X 10 or glue up two or three narrow strips, cut all these at the same time so that the legs and top will be the same width, then cut to length. Rip the two sides from a length of 1 X 4, cut to length, then round the two bottom corners on each. Print the heart cut-out pattern and trace it on to the bottom of each of the legs, measure in 4 3/8" and place the center mark of the pattern at that point. Cut the heart shape out of each of the two legs and sand smooth by wrapping sandpaper around a length of dowel about an inch in diameter. 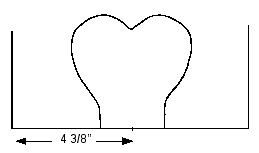 Optional: Drill a finger hole 1" in diameter in the center of the top to carry the stool. Sand all the outside surfaces and edges of the parts. Drill two 1/4" diameter holes 7/8" deep in the top end of each of the legs 2" from the edges. Place a dowel center in each of the two holes, clamp a strip of scrap material across the end of the under side of the top 1'" from the edge. 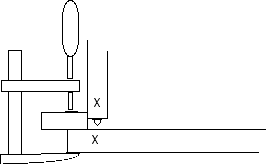 Align the edges of the legs and the top, press the leg section down so the dowel centers indent the underside of the top. Mark an X as shown on the side of the top and the side of the legs as shown. Place the scrap material at the other end and mark the second set of holes for the dowels using the other leg section, mark these with a Y. Drill 1/4" dia. holes 1/2" deep at the marks on both ends. Put a drop of glue in the holes in the X end of the top and leg section, then insert 1 1/4" dowels into the holes of the leg section, run a bead of glue across the top and press the dowels into the holes aligning the X's. Hold in position with bar clamps until glue sets. Repeat for the Y end. 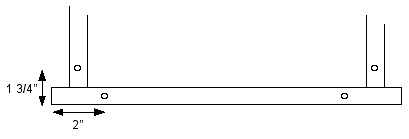 When the glue has set drill a hole 7/8" deep in the side of the top 2" from the end and one in the side of the leg section 1 3/4" from the top surface at each end and on both sides of the assembly. Lay the assembly upside down on a flat surface, place dowel centers in each of the four holes, set the side piece down beside the assembly with the rounded corners up, align the ends of both parts and press the side piece into the dowel centers to mark the dowel holes. Drill 1/4" dia. holes 1/2" deep in the side piece, repeat for other side, insert 1 1/4" dowels with some glue into the holes in the main assembly, run a bead of glue along the edge, boths sides can be done, press on the side pieces and secure with bar clamps across the assembly until glue is set. Sand the top and touch up any edges, finish with oil or varnish, depending on the desired effect. |
Minimiun Tools Required
1/4" Drill Bit
|
