"Helping woodworkers online for over 20 years"
This is a reprint from "Things To Make" by Archibald Williams published in the early 1900's. I have included it
because it looks like it would be an easy project to do and it is interesting to read a plan that calls for
1/4" thick "stuff" and advises that one may "lament" if they drive the wedges in too tight and split the wood.
|
A HANDY BOOKSTAND.
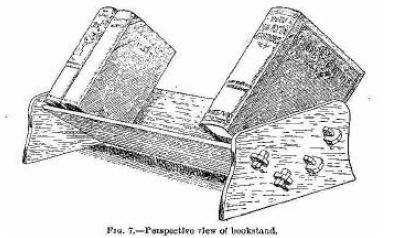
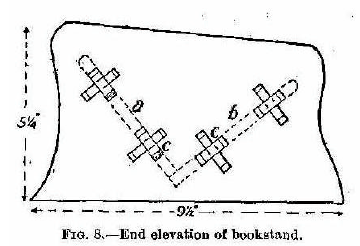
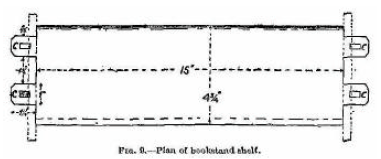
A bookstand of the kind shown in Fig. 7 has two great advantages: first, it holds the books in such a position that their titles are read more easily than when the books stand vertically; second, it can be taken to pieces for packing in a few moments, as it consists of but four pieces held together by eight removable wedges. We recommend it for use on the study table. Oak or walnut should preferably be chosen as material, or, if the maker wishes to economize, American whitewood or yellow pine. Stuff 1/4 inch (actual) thick will serve throughout if the stronger woods are used; 3/8 inch for the shelf parts in the case of whitewood or pine. The ends (Fig. 8) are sawn out of pieces 5-1/2 by 10 inches, and nicely rounded off on all but the bottom edge, which is planed flat and true. The positions for the holes through which the shelf eyes will project must be marked accurately, to prevent the stand showing a twist when put together. The simplest method of getting the marks right is to cut a template out of thin card and apply it to the two ends in turn, using the base of each as the adjusting line. Fret-saw the holes, cutting just inside the lines to allow for truing up with a coarse file. The shelves a and b are 15 inches long, exclusive of the lugs c, c, c, c, and 4-1/2 and 4-3/4 inches wide respectively. As will be seen from Fig. 8, b overlaps a. Both have their top edges rounded off to prevent injury to book bindings, but their bottom edges are left square. As the neatness of the stand will depend largely on a and b fitting closely against the sides, their ends should be cut out and trued carefully, special attention being paid to keeping the shoulders between and outside the lugs in a straight line. The wedge holes in c, c, c, c measure 1/2 by 1/4 inch, and are arranged to be partly covered by the sides, so that the wedges cannot touch their inner ends. (See Fig. 9.) This ensures the shelves being tightly drawn up against the sides when the wedges are driven home.
Fig. 8. -- End elevation of bookstand. The wedges should be cut on a very slight
taper of not more than half an inch in the foot run, in order to keep
their grip. Prepare a strip as thick as the smaller dimension of the
holes, 3/8 inch wide at one end, and 7/8 inch wide at the other.
Assemble the parts and push the piece through a hole until it gets a
good hold, mark it across half an inch above the hole, and cut it off.
Then plane the strip down parallel to the edge that follows the grain
until the end will project half an inch beyond the lug next fitted. Mark
and cut off as before, and repeat the process until the eight wedges
are ready in the rough. Then bevel off the outside corners and smooth
them as well as the rest of the woodwork with fine sand paper. Shelves
and sides should be wax-polished or given a coat or two of varnish.
Fig. 9. Plan or bookstand shelf. Don't drive the wedges in too tight, or you may have to lament a split lug. If the stand is to be used for very heavy books, or the shelves are much longer than specified here, it is advisable to bring the angle of the shelves down to the bottom of the standards, to relieve the shelves of bending strain at the centre; or to use stouter material; or to unite the shelves at two or three points by thin brass screws inserted through holes drilled in the overlapping part. |


